
Contact [email protected] or please fill out the form below with details about the issue.
Paver Installation
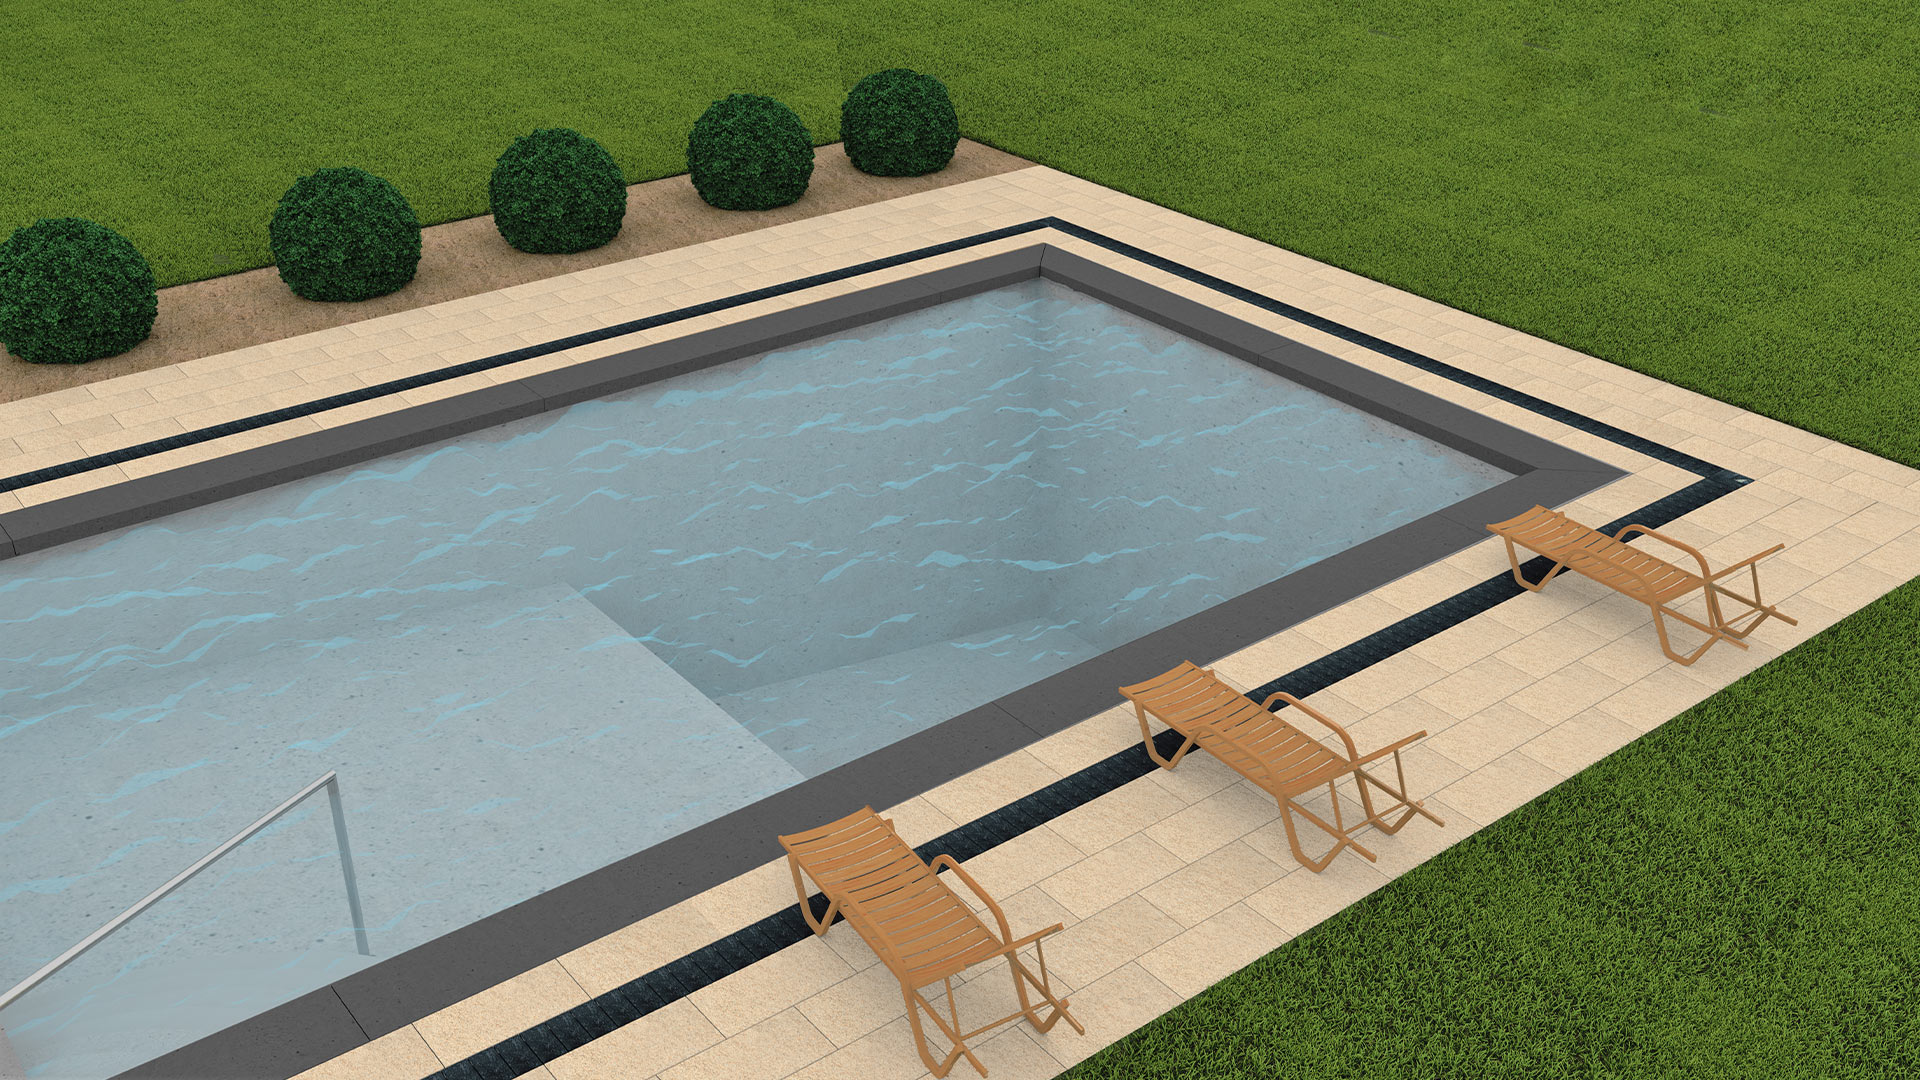
How to Install Pool Coping
This guide will take you through different pool coping installation methods for different kinds of pools, as well as various coping types.
How-to Guide PDF Version:
OVERVIEW
There are THREE pool types that require different approaches to installation coping.
- VINYL LINER OR FIBERGLASS POOL
- VINYL LINER OR FIBERGLASS POOL WITH RECESSED CONCRETE OVERLAY
- CONCRETE POOL
Topics
- Tools and Equipment
- Construction Supplies
- Vinyl Liner or Fiberglass Pool Coping Installation
- Vinyl Liner or Fiberglass Pool Recessed Concrete Overlay
- Swimming Pool Concrete Pool
- Coping Types
- 90° Corner - Miter Joint
- 90° Corner - Tight-fit butt joint
- 90° Corner - Coined
- Straight Wall Coping
- Curved Wall Coping
- Mitering Coping for Curves
- Adhering the Coping
- Need Help Designing and Building Pool Projects?
1. Tools and Equipment
When installing pool coping, having the right tools and equipment is essential for a clean, professional finish. Common tools include a wet saw for precision cutting, rubber mallets for gentle positioning, and a level to ensure even alignment. You’ll also need safety gear like gloves and eye protection, as well as specialized adhesives or sealants depending on the coping material. Proper tools not only improve efficiency but also help prevent damage during installation.

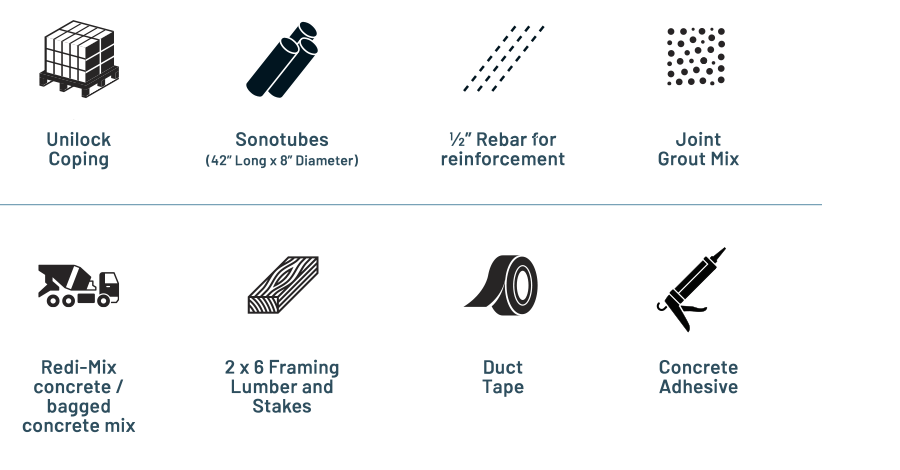
2. Construction Supplies
Pool coping construction supplies include essential materials needed to secure a long-lasting installation. These typically include bedding material such as mortar or polymeric sand, construction adhesive for bonding, and jointing materials like grout or flexible sealant to accommodate expansion and prevent water infiltration. Additional supplies may include edge restraints, and drainage components to support structural integrity. Using the right supplies helps achieve a durable, professional-looking finish that withstands exposure to water and weather.
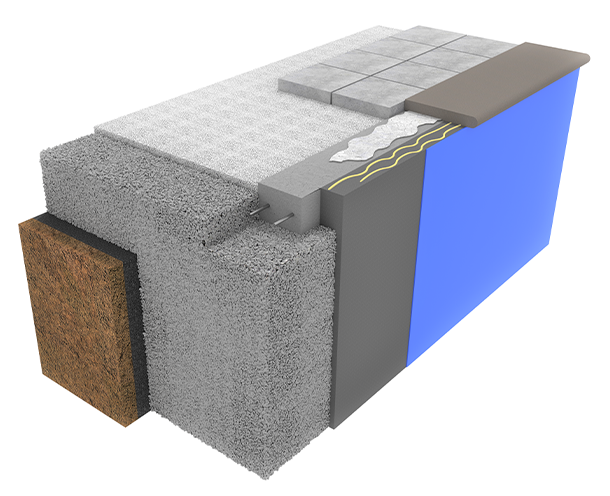
3. Vinyl Liner or Fiberglass Pool Coping Installation
Vinyl Liner and Fiberglass are the most common pool types. The method for installing pool coping is basically the same for both.
- Step 1: Frame and pour a reinforced concrete collar around the perimeter of the pool. Minimum size should be 6 x 6 x 6″ (150 x 150 x 150mm).
- Step 2: Ensure the top of the collar is recessed ½” (12mm) down from the top of the pool and troweled to an even surface. Brush finish.
- Step 3: Let collar cure for a minimum of 3 days.
- Step 4: Dry-fit all coping and make appropriate cuts (refer to cutting techniques covered later in this guide).
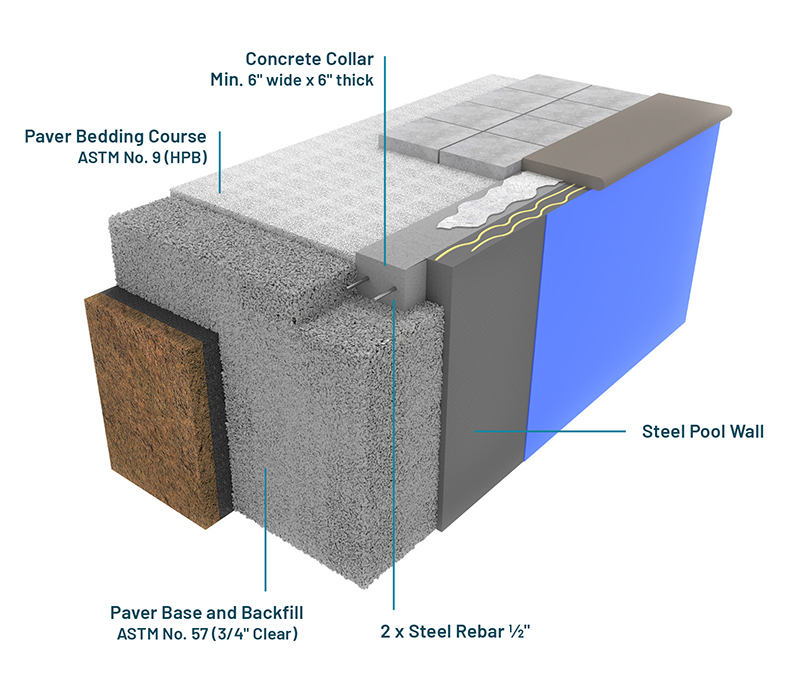
4. Vinyl Liner or Fiberglass Pool Recessed Concrete Overlay
This pool coping installation method is very similar to the previous method with the exception of an additional concrete underbase over which pavers can be placed to eliminate any possibility of paver settlement.

- Step 1: Frame the concrete collar form to accommodate ½” (12mm) mortar between it and the coping.
- Step 2: Frame the concrete underbase at least 4″ (200mm) thick and provide enough recess from top of collar to underbase surface to accommodate the paver thickness plus 3/4″ of HPB (ASTM No. 57) bedding material. You may eliminate the 3/4″ of bedding if you are installing the pavers directly over the concrete in which case you must ensure that the surface is troweled to an accurate fine finish. NOTE: Direct concrete overlays will not allow paver surface leveling with a tamper to remove height variances.
- Step 3: Reinforce the concrete underbase with ½” (12mm) rebar and support it on Sonotubes spaced at 4 ft intervals.
- Step 4: Ensure that the underbase slopes away from the pool edge approximately 2%.
- Step 5: Dry-fit all coping and make appropriate cuts (refer to cutting techniques covered later in this guide).
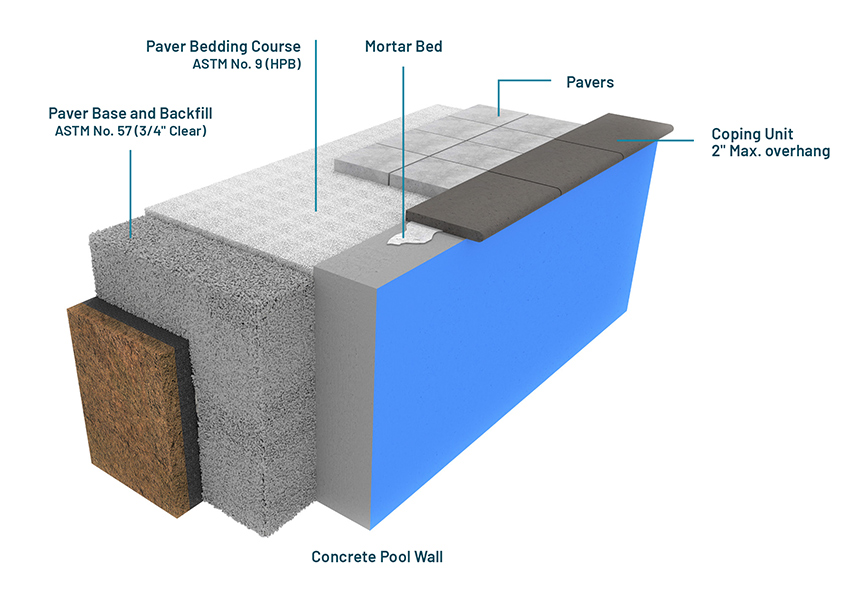
5. Swimming Pool Concrete Pool
This is the easiest method since the pool wall provides the structural support for the coping units.
- Step 1: Scarify (roughen up) the top of the pool’s concrete wall. This will ensure good adhesion of the mortar and the coping.
- Step 2: Dry-fit all coping and make appropriate cuts (refer to cutting techniques covered later in this guide).
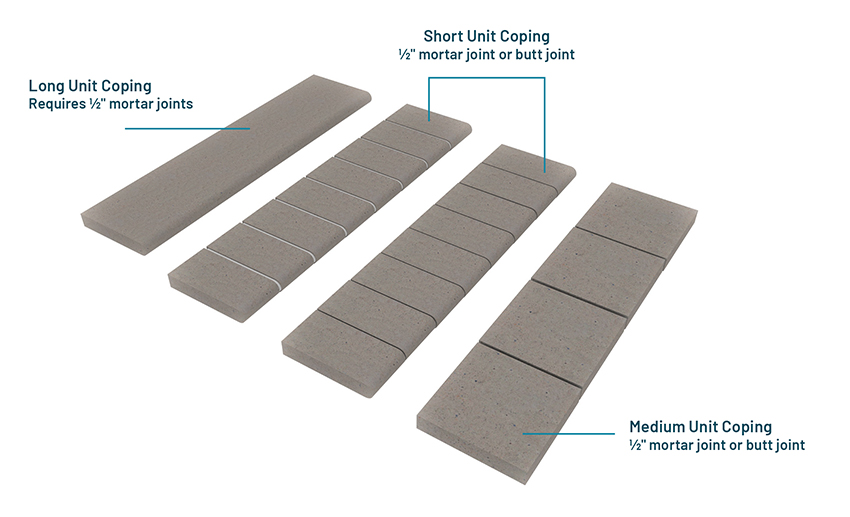
6. Coping Types
There are many manufactured and natural stone coping options to choose from. Longer units tend to be for straight designs and shorter units used for curvilinear pool designs.
Some designs also are more suited to mortar joints instead of tight-fitting butt joints. Butt joints are more work when it comes to cutting but time is saved because there are no mortar joints. Mortar joints can make things easier by allowing you to fine tune spacing on radius projects. Mortar joints also provide added visual texture.
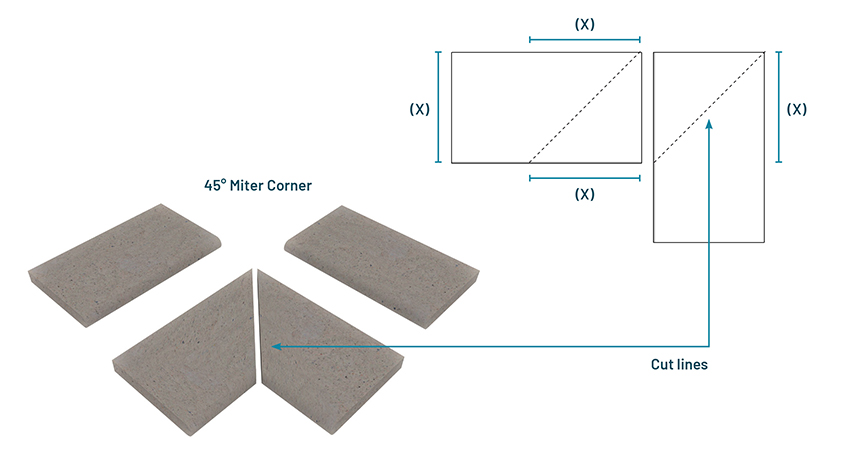
7. 90° Corner - Miter Joint
Miter cuts are generally the preferred coping cut as they result in the best appearance. However, making miter cuts can be tricky and may take several tries for inexperienced hardscapers. Practicing on remnants and waste material is a good idea until your technique is refined. Accurate measurements are the key to a successful cut.
- Important: Make all your 90° corners before installing the rest of the coping around the pool.
- Use a hand-held masonry saw or a wet masonry table saw. Wet masonry table saws are the most accurate.
- If your plan is to use a grouted joint, your cuts can be slightly more forgiving. Allow 1/4″ between units for the grout.
- For tight joints, you may need a small grinder with a diamond blade to fine tune the edge.
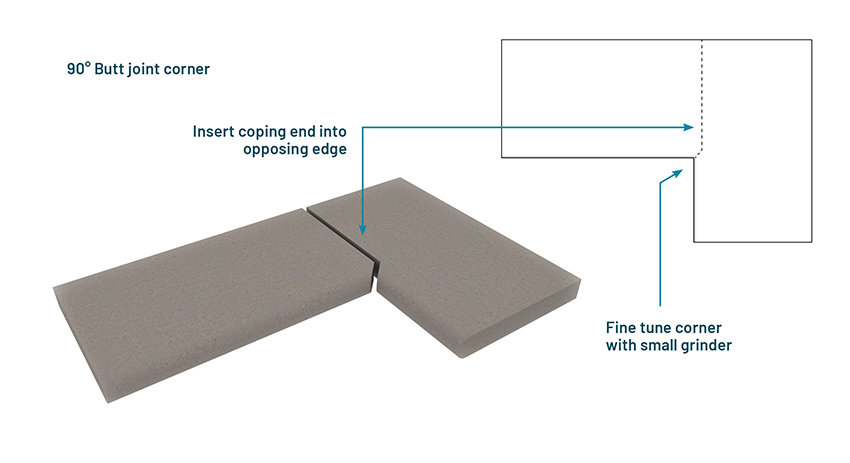
8. 90° Corner - Tight-fit butt joint
A tight fit butt joint is easier to fit than a mitered joint, so it’s often used by less experienced installers. A butt joint also avoids the long points of a mitered joint which can get damaged while cutting or during installation.
- Important: Always make all your 90° corners before installing the rest of the coping around the pool.
- Depending on the style of coping, tight fit butt joints may require an indentation cut to one unit to accommodate the end of the opposing unit.
- A hand-held saw along with the help of a small hand grinder will make this easy. Always practice on scrap pieces.
- A flexible grout is recommended between all coping joints with 1/4″ spacing between units. If your plan is to have ½” (12mm) mortar joints, then your cuts can be modified slightly to accommodate the spacing. Apply grout between units before sliding them together
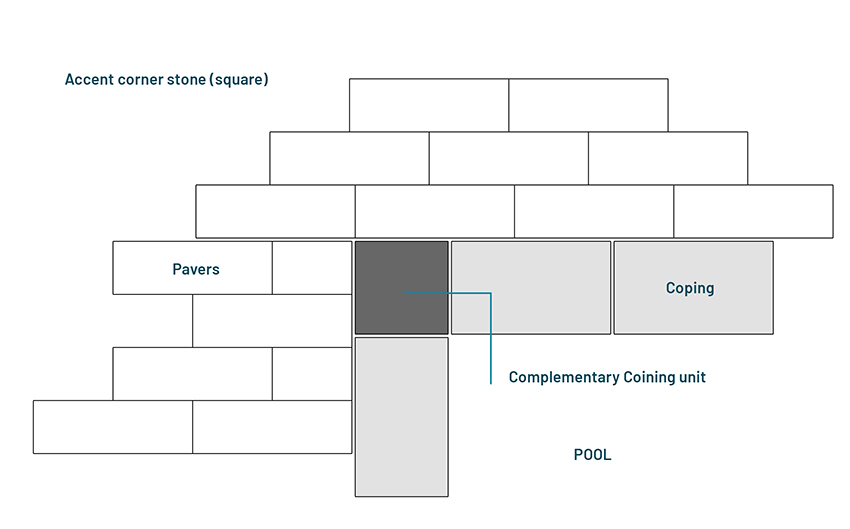
9. 90° Corner - Coined
Coining a corner is by far the easiest way to construct a corner and saves cutting. Choosing a different color or texture for the “coin”, can add visual interest.
- Important: Install all your 90° corners before installing the rest of the coping around the pool.
10. Straight Wall Coping
- Longer units install faster and look better. Maximum recommended length is 72” (1.8m)
- Shorter units install slower but are generally less expensive.
- A tight-fit butt joint is easier to fit than a mitered joint, so it’s often used by less experienced installers.
- Always install corners first and then fill in up to corners.
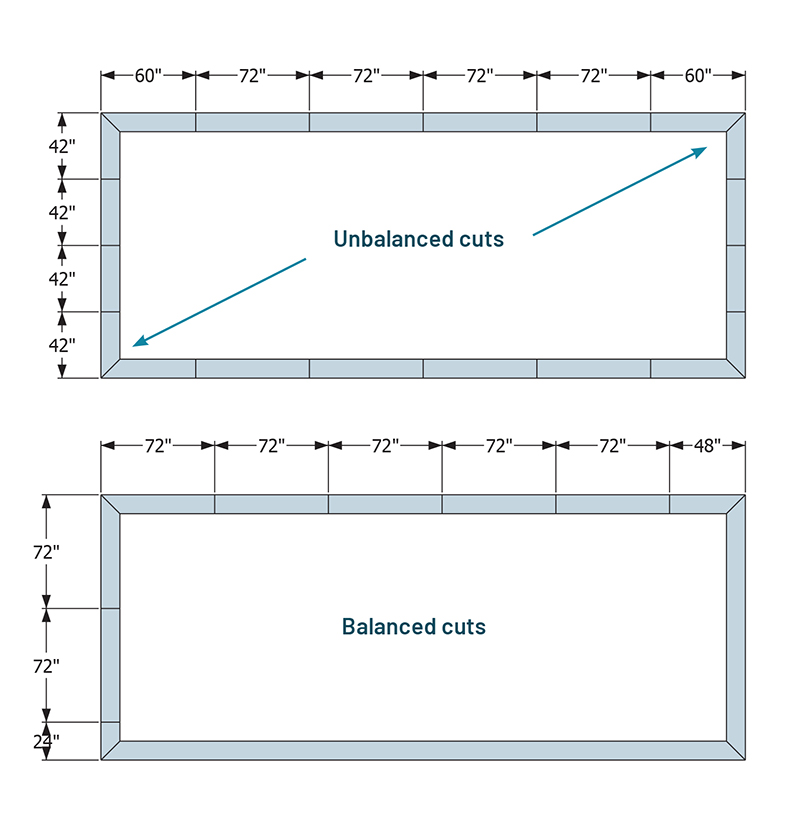
- Dry fit your coping first and work out cuts strategically to avoid short awkward cuts and unbalanced lengths that are not visually pleasing.
- Think about balance prior to ordering coping units. In the example below there are 2 lengths that must be ordered for a balanced install. 8 pieces x 48” and 12 pieces x 72”.
- Always order units that are longer than you need to give you some flexibility.
11. Curved Wall Coping
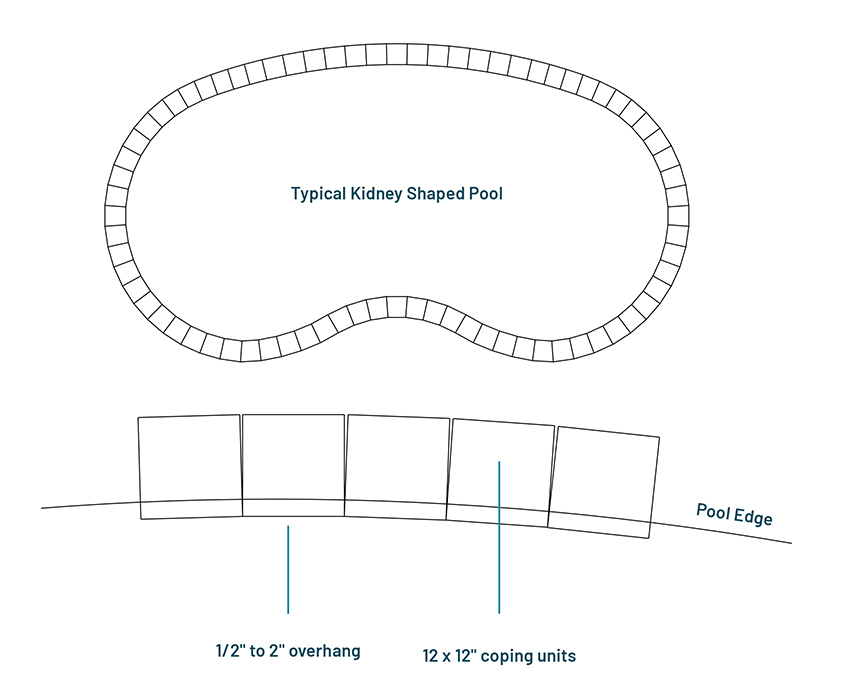
Mitering coping units around curved pools is a combination of mathematics and art. Whether you are planning a mortar joint or a tight fit joint, you may need to miter some or all of the coping units. This illustration shows 12 x 12” (30 x 30cm) coping units. The same process applies regardless of the size of the coping units.
Note: Shorter coping units will “flow” better and not look choppy. Avoid units longer than 18” (45cm) for radius pools.
12. Mitering Coping for Curves
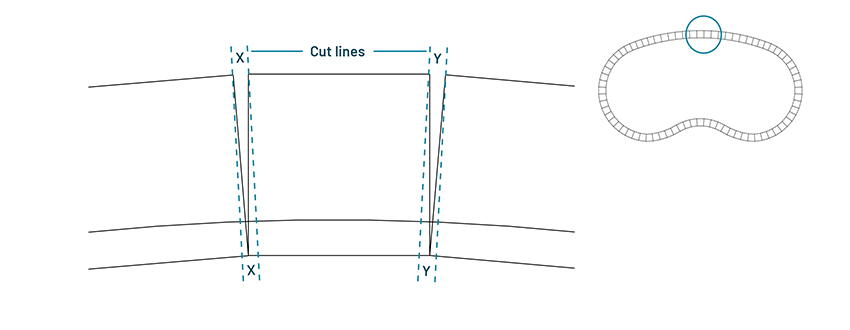
- Step 1: Dry lay 3 or 4 coping units along the pool edge so that the front edges or back edges are touching depending on the curvature. (See diagram below).
- Step 2: Overhang the units over the pool wall by approximately 2”.
- Step 3: Using a straightedge such as a level or square, mark two parallel lines over the gap to be mitered.
- Step 4: Cut using a hand-held masonry saw or a wet masonry table saw.
- Step 5: Check to make sure the units fit well and then proceed to the next batch of 3 or 4 units until complete.
Tip: For tight pool coping fit installation you can “perfect” a joint by running the masonry saw between two adjacent units which are touching. This creates a perfect fit every time. (Be careful not to cut the pool wall below)
13. Adhering the Coping
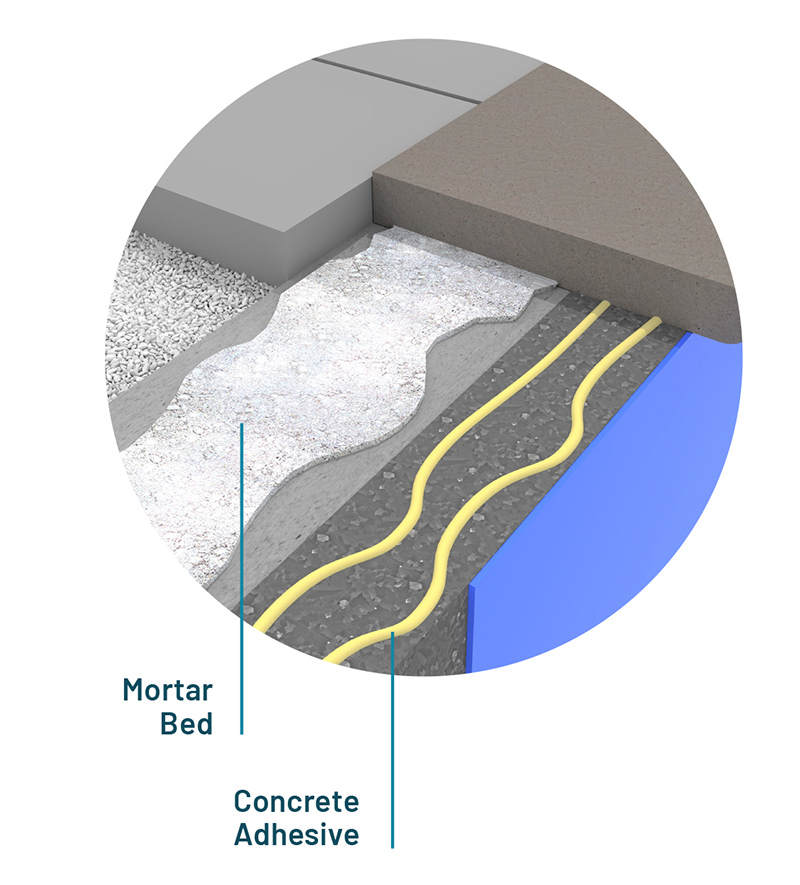
Adhere coping to the pool perimeter with concrete adhesive between the coping and the pool wall, and a bed of mortar between the concrete collar and the remaining of the coping’s underside. The mortar bed allows you to tweak the slope of each unit, while the concrete adhesive will provide longevity of the installation.
- Step 1: Ensure the coping is clean.
- Step 2: For straight-sided pools, always construct the corners first and work towards the middle. This way you can make cuts to adjust lengths where required.
- Step 3: Use a modified mortar such as Ardex X32 or X37 to adhere units to the concrete collar, and always follow the manufacturer’s instructions. Apply the mortar using a 1/4″ notched trowel. Pre-wetting the concrete collar and using a slightly wetter mix of mortar will help units adhere better.
- Step 4: Coping should overhang approximately 2″ (50mm) and slope at a 2% grade away from the pool. Use a string line to maintain straightness and a torpedo level to maintain the slope of each unit.
- Step 5: Do not let grouting mortar cure on the surface of the coping. Always clean any mortar residue off the surface of the coping and adjacent pavers with a soft brush, warm water and a sponge as you go. Fill the joints between
units with an exterior tile grout.
14. Need Help Designing and Building Pool Projects?
For more help designing and building pool projects, contact your local Unilock Territory Manager or call 1-800-UNILOCK to arrange a consultation or site visit.
How-to Guide PDF Version:


